photo WarriorQueenHeader_zpsa2d93a61.png
Showing posts with label diy. Show all posts

Tuesday, February 18, 2014

DIY Sharpie Mug + Hot Chocolate Truffle Ball Recipe [Guest Post]

Today, one of my fabulous sponsors is taking over the blog today! She's here to offer all of my cold readers, something to warm you up! 

Thank you, Raewyn for letting me take over your blog today with a DIY project and recipe that will hopefully add some warmth to this cold, cold winter!  I’m Jessica, here today from Living La Vida Holoka to show you how to make an easy project that would make a friendly little winter gift or a great treat to reward yourself from all that snow shoveling I’m sure you’ve been doing!  All you need for both projects are some items you probably already have in your home, plus a few that can easily be purchased for a few dollars.  First I’ll show you how to personalize a mug.  Then I’ll show you what to fill it with!

It’s so easy to personalize a mug for yourself or a loved one.  Find plain white oven-safe mugs at the Dollar Store or, if you’re lucky like me, stored away in the back of your kitchen cabinet!


DIY Sharpie Mug

- plain, white, oven-safe mug
- Sharpie markers (I prefer black, but have fun with colors and metallics!)

It’s important NOT to preheat your oven for this project.  You want to let the mug acclimate to the oven heat.  Decorate your mug however you like.  Have fun with it!  Make a personalized mug with your name or draw a great design.  Want to designate a mug for tea?  Draw a fun tea bag tag hanging over the edge of your mug.  I designated this mug for hot chocolate with a reminder to never forget the most important ingredient in a perfect cup of hot chocolate--the marshmallows!  When your design is finished, place it directly on your oven rack and turn your oven on to 350ยบ.  Let your mug bake for 30 minutes.  It’s also important to allow the mug to cool down in the oven before removing it. 

Now that you have a fancy new mug, what are you going to fill it with?  Since I made a mug for hot chocolate, how about some Hot Chocolate Truffle Balls?


Hot Chocolate Truffle Balls

- 1 - 12 ounce bag of semi-sweet chocolate morsels
- 1 c. heavy cream (you can also substitute coconut milk from the can as I did)

Heat chocolate and cream in a medium pot over low heat, stirring often.  When chocolate is completely incorporated into cream, remove saucepan from heat.  Let mixture cool at room temperature.  Pour mixture into a bowl or do as I did and stick the entire pot in the fridge.  Cover and let sit until mixture becomes firm and scoopable

Scoop mixture into balls and place them on a parchment or plastic wrap lined baking sheet.  Stick baking sheet back in fridge for 20 minutes.  Wrap truffle balls in plastic wrap and place in freezer until ready to use. 


To make hot chocolate:

Carefully add one truffle ball to hot milk.  Stir well until chocolate is combined.  Top with marshmallows or whipped cream.  Enjoy!

Jessica is a New Jersey blogger, wife, self-proclaimed foodie and DIY-er who also writes about local life and love on her blog Living La Vida Holoka.  She also sells handmade jewelry, wood block silhouettes, craft supplies and art prints in her Etsy shop, A Little Loka.  Receive 25% off your next order with code WARRIOR25 from now until March 18th.


 photo name.jpg

Check out one of our featured Warrior Queens:

Tuesday, January 7, 2014

Simple and Fun Baby Boy Shower


On Sunday I threw what I have to say was the perfect baby shower! I had never thrown a baby shower before, but with a friend of mine we were able to get everything pretty much done the day of the wedding (with a few DIY projects the day before).

Maggie, Amanda and I - shades of blue! 


If you're ever in a time crunch - these are the perfect ways to throw an amazing party!

Refreshments and Snacks

 Blue lemonade
Mason jars with name tags
Boy Baby Shower straws

Blue lemonade: frozen lemonade mix, water and blue food coloring. 
Snacks - pasta salad, veggie platter, fruit plate, chips and dip


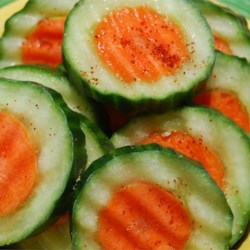
We decided to do snacks because it would be too expensive to feed everyone a meal, and more time consuming. We chopped up celery, carrots and cucumbers. Although we didn't have the tools this time, one of my favorite ways to make a veggie tray is to core a cucumber and stick a carrot through it, then using a special cutting tool, crinkle cut the two. It looks like this:


Via

Decorations

 We had minimal decorations, but it was the perfect touch so that it wasn't overwhelming.


Polka dot garland


"It's a Boy!" banner and balloons


Table top - marble scatter, blue baskets for chips, clear dishes for dip, "It's a Boy" kisses


Treats! 

Pretzel stick favors, Vanilla baby cake


My mom made the cake. She has a side business of treat making! She makes the best desserts. For this cake, she used her frosting recipe, and gum paste to make the feet and buttons.


Our DIY Projects


The dipped pretzel favors are beyond easy to make!


Ingredients:

  • Pretzel Rods (I used Snyder's of Hanover, found at the grocery store) 
  • Melting Candy (I got two color's at Michael's for 2.99 each) 
  • Sprinkles 

Directions:

  1. Microwave the candy. Pour them into a microwave safe dish and microwave at 1/2 power for 1 minute. Stir. Microwave at 1/2 power for 30 seconds. Stir. Keep microwaving in 30 second intervals and stirring until liquid. *It is important to use half power so you do not burn the candy!* 

  2. Dip pretzel rods into dish to cover. Let drip into the dish so that it doesn't look runny. 

  3. Sprinkle with sprinkles 

  4. Let dry for 24 hours. 


Mason jar name tags!

Supplies:

  • String (we also used this for a baby game) 
  • Textured paper 

Directions:

  1. Cut circles on textured paper
  2. Hole punch
  3. Tie string around mason jar, putting the name tag on the string at this time. Knot.
  4. Tie a small bow with the string. 


Baby Shower games! 

I do not have any pictures of the games, but we played Bingo!, a cute game called pass the gift and the traditional "measure the belly" game. I have a few more games we didn't play, but that I've played at another baby shower. Here is the free download I put together. 

For our prizes, we bought cheap candles at Michael's and wrapped them up. 

And that's a wrap! But here is an adorable picture of my niece who is about to be a big sister!! 

She had a lot of sugar while we were cleaning up, so we tied the balloons to her so she couldn't run as fast. 

Have a great Tuesday! 
 photo name.jpg


Wednesday, July 3, 2013

Wedding Wednesday: DIY Crafts


So I was about to write my Carabox reveal and stumbled across Chit's and Giggles' Wedding Wednesday post. I love love love this link up. (I hate to say this but, I do love talking about my wedding...well, anyone's wedding...or life for that matter!) 

I want to share a couple of my DIY projects that I am going to attempt to create. Key word: Attempt. I'm crafty and they're cute buuuuuut I'm also a little clutzy, so hopefully they last! 

I am not a crazy Pinterest-er, but I try to get on every once in awhile so that I can see all of the fun crafts that people are doing and posting. 


Our ringbearer is going to be a little over 3 years old, so I really want to make sure he doesn't lose our rings! Directions found here.


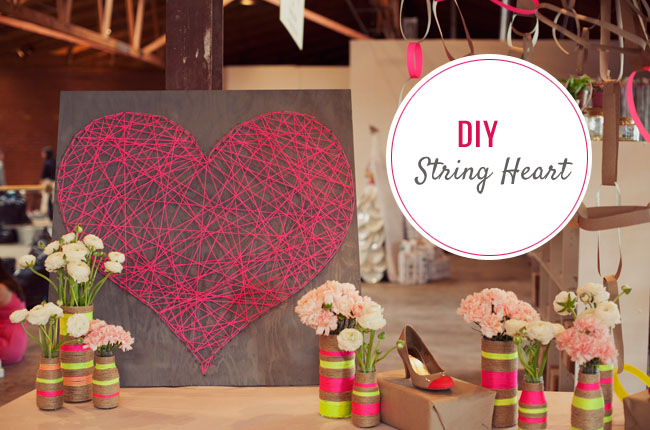
Does anyone remember making those cool string things in school? They were my favorite. This is going to be our backdrop. Iman even wants to make it with me! Directions found here


Ribbons! Our venue doesn't let us do confetti, rice, sparklers or anything like that. We could probably blow bubbles but I would somehow get bubble in my eyes. I know it! So, I'm going to make ribbon wands. Directions found here.


Chits and Giggles
 photo name.jpg

Friday, January 6, 2012

Organizing DIY

Well, it's the New Year. It's here, HELLO 2012!!

This year's going to be full of craziness, busy-ness and who knows what else but I think it's best to start off the year with a little bit of organization...DIY style :)

Buying a ton of organizational stuff can get expensive, so let's stick to the essentials and make what we can! I've made a list of the stuff that I like to use to keep organized throughout the year and how to make them!

1. Buy a planner. Hands down - the easiest way to stay organized. Pick one that you REALLY like, cause you're stuck with it all year (unless you're like me and have numerous planners...)


Related Posts Plugin for WordPress, Blogger...